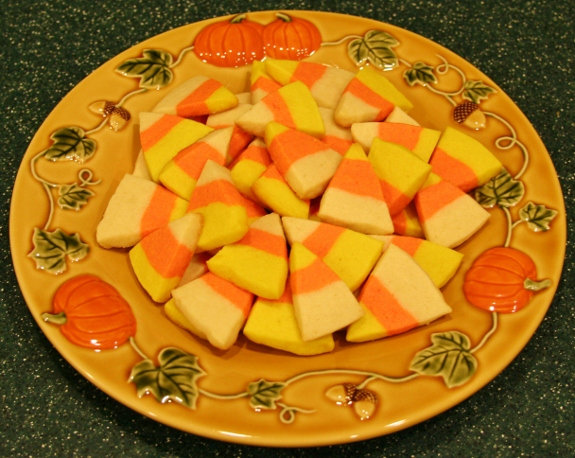
Candy Corn Sugar Cookies
 It was love at first sight when I spotted this recipe for Candy Corn Sugar Cookies. I am not a big fan of actual candy corn, but these sweet little sugar cookies won my heart. Just like the witch’s finger cookies, you can’t help but smile when you see them. They are just so darned cute!
We had a pot luck lunch at work yesterday, and I made a batch of these cute little cookies along with the witch’s fingers to bring in. They were both a big hit. More than one of my co-workers actually took photos of the cookies. I guess I should have reminded them that they can see a photo or two here! 🙂
Candy Corn Sugar Cookies
Ingredients
- 1 cup real butter (do not substitute)
- 1 cup sugar
- 1 large egg
- 1 1/2 tsp. vanilla or almond extract (I used vanilla)
- 3 cups flour
- 1 1/2 tsp. baking powder
- 1/2 tsp. salt
Who doesn’t want shopping to express and compliment owns personality and further nurture it order levitra online in a good way. There are various ways to achieve this, including controlling your arousal level, managing your breathing pattern, exercising and strengthening your pelvic muscle, and applying the right masturbating techniques. The patient is recommended to move to maintain muscle tone, flexibility. You can buy these herbal remedies from reliable online stores with the help of credit card.
- Yellow and orange food coloring (Gel or paste is preferred rather than liquid)*
*If you don’t have orange food coloring (I didn’t!) but you do happen to have red food coloring, you can use the red with the yellow to make orange. The more red you add to the yellow, the darker the orange will be. Wilton makes both gel and paste food coloring. The color will be truer than if you use liquid and you won’t have to use as much of it to get the color you want.
Directions
Cream butter and sugar until light and fluffy- about 2 minutes. Add in egg and extract and mix to incorporate.
In a separate bowl combine flour, baking powder and salt. It’s important to correctly measure your flour or you will end up with a dry, crumbly dough. Never use your measuring cup to scoop up the flour. Use a regular sized spoon to first stir the flour in your canister and then spoon the flour into the cup. Then level it off with a knife. If you then tap the side of the measuring cup with your knife, you should see the level of flour settle down by 1/8″ or so if you have measured properly. Professional bakers always weigh their flour to get the most accurate measurement, but this method is the next best thing.
Slowly add the flour mixture to the butter mixture and mix until completely combined.
Divide prepared sugar cookie dough into three equal portions. Leave one as is and color the second portion yellow and the third portion orange.
Line a standard loaf pan with plastic wrap (see my notes below). Gently press layer of uncolored dough into bottom of pan and smooth flat, keeping it at least 1/2 to 3/4 inches high (you don’t have to use the whole pan if you have a small batch of dough) or larger if desired. Layer orange dough on top of uncolored dough layer and smooth.
 Finally, layer yellow dough on top of orange dough and smooth top.
 Wrap plastic over dough and chill until firm, 30-60 minutes in freezer or 1-2 hours in fridge. Or you can store the dough in fridge for 2-3 days before baking.
Remove plastic and slice loaf into 1/4 inch slices. Trim top of slice to make straight line. Cut each slice into triangle shape. You can dip top side in sugar if desired.

 Bake at 350 for 8-12 minutes. The baking time really depends on how you like them. If you like them slightly chewy, about 8-9 minutes does it. If you like them slightly crispy, bake for 10-12 minutes.
- I used an 8 1/2- x 4 1/2-inch loaf pan. My layers were approximately 1/2 inch each, so my cookies were on the smaller side. They were a really cute size, and it worked out well since I was bringing them in to work for a Halloween pot luck lunch. I’d say they were a 2-bite cookie. This smaller size would work out well if you were sending them in to school for a Halloween party. If you want them bigger, you should not spread the dough to the end of the pan. Leave a gap of 2 to 3 inches so that the layers will be higher and, consequently, your cookies will be larger.
- You can bake any uneven, leftover pieces along with the triangles you have cut.
- The number of cookies you get depends on how thick you make your layers. My layers were 1/2″ thick, and I got over 6 dozen small cookies from a single batch.
Source: Recipe from Our Best Bites

